seatunnel学习笔记(二)
配置文件格式
首先,env和source和sink里面的内容是必须的,但是transform中的内容不是必须的,如果不需要做etl处理就可以将transform中的内容置为空
env
env中可以直接写死spark或者flink的配置项,并行度,检查点间隔时间等等,但是还是建议不要写死,在外面命令中写就可以调节变化了
我们也可以在env中直接写一下这个任务是流模式的还是批模式的,和这个任务的名称,速度控制等等配置
1
2
3
4
5
6
| env {
job.mode=STREAMING # 流模式
job.name=SeaTunnel_Job # 任务名称
read_limit.bytes_per_second=7000000 # 每秒读取字节数
read_limit.rows_per_second=400 # 每秒读取行数
}
|
source
source可以配置多个数据源
1
2
3
4
5
6
7
8
9
10
11
12
13
14
15
16
17
18
19
20
21
| env{
...
}
source{
hdfs{...}
elasticsearch{...}
jdbc{...}
}
transform{
sql{
sql = """
select ... form hdfs_table
join es_table
on hdfs_table.uid = es_table.uid where ...
"""
}
}
sink{
elasticsearch{...}
}
|
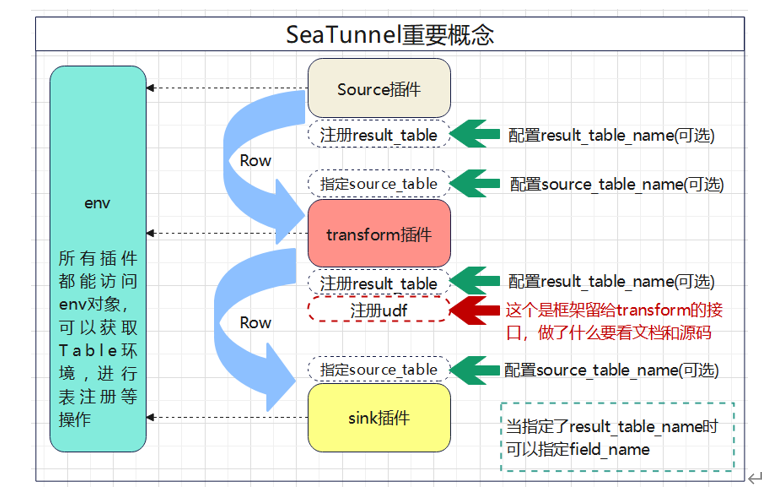
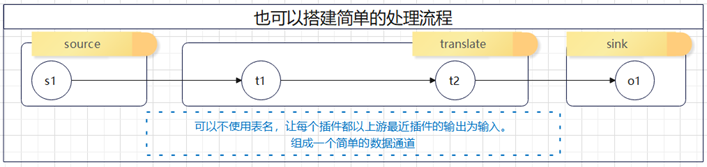
这里需要注意的是source中都可以声明result_table_name,如果声明了result_table_name,source就会把DataStream转换成Table并且注册在Table的环境中
指定了result_table_name,还可以指定field_name,这个下面再说
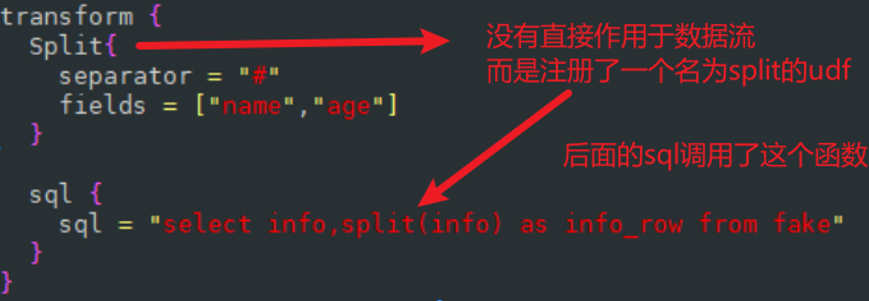
目前可以使用的插件有两个,一个是split,一个是sql
transform中可以声明多个转换插件,所有的转换插件都可以使用source_table_name和result_table_name,如果我们声明了result_table_name,那么我们就可以声明field_name
- 处理批数据:processBatch(DataSet进,DataSet出)
- 处理流数据:processStream(DataStream进,DataStream出)
- 预备工作,一般是解析配置使用:prepare()
- 注册函数,每个transform插件作用于流之后调用的一个函数:registerFunction
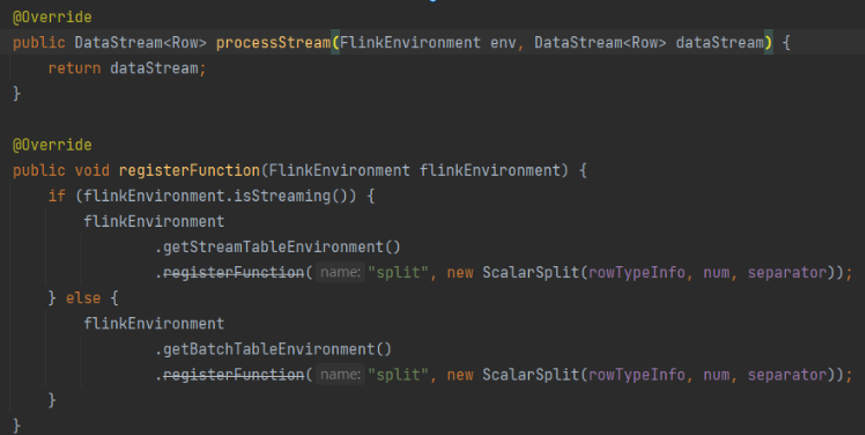
这里有一个问题要注意,首先我们看一下seatunnel的源码

我们发现这个源码中对于这个处理流的方法没有做任何处理,直接return了;对于在注册函数中,他注册了一个名为split的udf函数,并且这个函数的名称是写死的,就意味着如果后面声明了多个split,后面的split就会覆盖前面的split的规则
这里就是我们需要注意的问题1
前面是注册了一个函数,后面是使用这个函数
sink
sink里面可以指定多个sink插件,不过不一样的sink的配置相差比较大,具体需要看一下官网
sql格式配置文件
除此之外seatunnel还支持sql格式的配置文件
1
2
3
4
5
6
7
8
9
10
11
12
13
14
15
16
17
18
19
20
21
22
23
24
25
26
27
28
29
30
31
32
33
34
|
CREATE TABLE source_table WITH (
'connector'='jdbc',
'type'='source',
'url' = 'jdbc:mysql://localhost:3306/seatunnel',
'driver' = 'com.mysql.cj.jdbc.Driver',
'user' = 'root',
'password' = '123456',
'query' = 'select * from source',
'properties'= '{
useSSL = false,
rewriteBatchedStatements = true
}'
);
CREATE TABLE sink_table WITH (
'connector'='jdbc',
'type'='sink',
'url' = 'jdbc:mysql://localhost:3306/seatunnel',
'driver' = 'com.mysql.cj.jdbc.Driver',
'user' = 'root',
'password' = '123456',
'generate_sink_sql' = 'true',
'database' = 'seatunnel',
'table' = 'sink'
);
INSERT INTO sink_table SELECT id, name, age, email FROM source_table;
|
可以写成类似如上的格式的sql配置
具体sql写法可以参考https://seatunnel.apache.org/zh-CN/docs/2.3.8/concept/sql-config/
seatunnel速度控制
1
2
3
4
5
6
| env {
job.mode=STREAMING # 流模式
job.name=SeaTunnel_Job # 任务名称
read_limit.bytes_per_second=7000000 # 每秒读取字节数
read_limit.rows_per_second=400 # 每秒读取行数
}
|
重要更新 —支持CDC同步
首先保证要使用CDC同步首先对应的数据库需要开启binlog
支持多表cdc写入
1
2
3
4
5
6
7
8
9
10
11
12
13
14
15
16
17
18
19
20
21
| env {
parallelism = 1
job.mode = "STREAMING"
checkpoint.interval = 10000
}
source {
MySQL-CDC {
base-url = "jdbc:mysql://localhost:3306/testdb"
username = "root"
password = "root@123"
table-names = ["testdb.table1", "testdb.table2"]
startup.mode = "initial" # 这里的设置是从头开始读取表中的全量数据,然后继续捕获后续的增量变更 还是earliest表示总binlog最早位置获取增量数据和latest表示跳过历史数据,直接从当前时刻获取增量变更数据
}
}
sink {
Console {
}
}
|
重要更新支持schema变更cdc同步
也就是支持表结构的变更也将这个变更信息作为事件发送到下游
1
2
3
4
5
6
7
8
9
10
11
12
13
14
15
16
17
18
19
20
21
22
23
24
25
26
27
28
29
30
31
32
33
34
35
36
37
| env {
# You can set engine configuration here
parallelism = 5
job.mode = "STREAMING"
checkpoint.interval = 5000
read_limit.bytes_per_second=7000000
read_limit.rows_per_second=400
}
source {
MySQL-CDC {
server-id = 5652-5657
username = "st_user_source"
password = "mysqlpw"
table-names = ["shop.products"]
base-url = "jdbc:mysql://mysql_cdc_e2e:3306/shop"
debezium = {
include.schema.changes = true # 这个debezium配置就是捕获库表的结构变化然后将这个结构变化作为事件发送到下游,这里设置为true就是将这个变更信息也发送到下游
}
}
}
sink {
jdbc {
url = "jdbc:mysql://mysql_cdc_e2e:3306/shop"
driver = "com.mysql.cj.jdbc.Driver"
user = "st_user_sink"
password = "mysqlpw"
generate_sink_sql = true # 这个是根据源表自动生成写入到目标表的sql语句,更简单了数据写入的配置
database = shop
table = mysql_cdc_e2e_sink_table_with_schema_change_exactly_once
primary_keys = ["id"]
is_exactly_once = true # 这个是保证了精准一次的数据处理
xa_data_source_class_name = "com.mysql.cj.jdbc.MysqlXADataSource" # 这个是保证精准一次的话使用的是mysql的XA事务
}
}
|
seatunnel还支持钉钉和飞书的sink
可以将获取到的cdc数据直接发送到钉钉机器人和飞书上面去
这个功能我理解可以做成监控预警,也可以cdc监控预警表中的变化发到对应的处理人员的飞书上或者钉钉上
这个功能暂时没有进行验证,今后搭建好环境有机会会对这个功能进行详细验证
复制
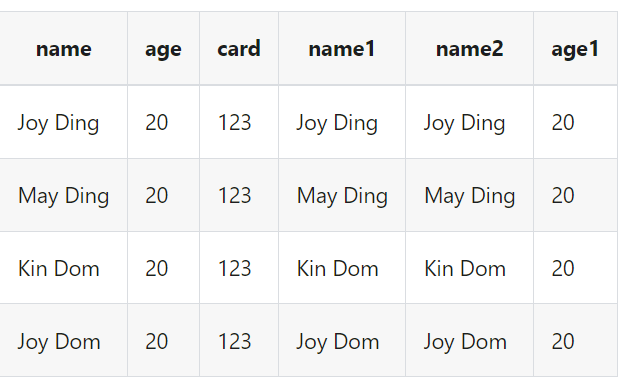
示例
假设我们读取到的数据是
我们想把字段name,age复制到新字段name1,name2,age1
1
2
3
4
5
6
7
8
9
10
11
| transform {
Copy {
source_table_name = "fake"
result_table_name = "fake1"
fields {
name1 = name
name2 = name
age1 = age
}
}
}
|
结果数据为:
动态编译
DynamicCompile
这个是一个可以使用编程的方式来处理行,但是如果转换的过程过于复杂就会影响性能
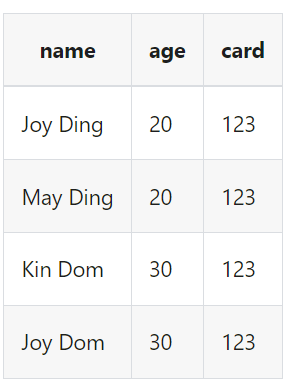
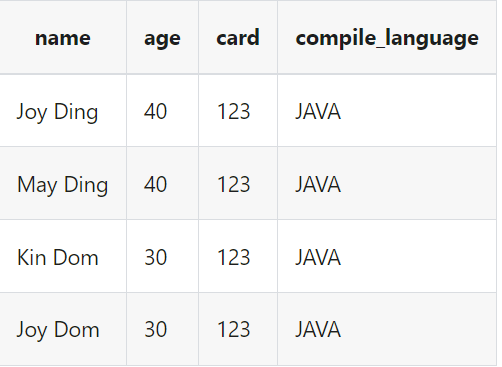
示例
我们源表的数据为
我们需要添加一列compile_language字段,并且将age字段更新,当age=20时将其更新为40
1
2
3
4
5
6
7
8
9
10
11
12
13
14
15
16
17
18
19
20
21
22
23
24
25
26
27
28
29
30
31
32
33
34
35
36
37
38
39
40
41
42
43
44
45
46
47
48
49
50
51
52
| transform {
DynamicCompile {
source_table_name = "fake"
result_table_name = "java_out"
compile_language="JAVA"
compile_pattern="SOURCE_CODE"
source_code="""
import org.apache.seatunnel.api.table.catalog.Column;
import org.apache.seatunnel.transform.common.SeaTunnelRowAccessor;
import org.apache.seatunnel.api.table.catalog.*;
import org.apache.seatunnel.api.table.type.*;
import java.util.ArrayList;
public Column[] getInlineOutputColumns(CatalogTable inputCatalogTable) {
PhysicalColumn col1 =
PhysicalColumn.of(
"compile_language",
BasicType.STRING_TYPE,
10L,
true,
"",
"");
PhysicalColumn col2 =
PhysicalColumn.of(
"age",
BasicType.INT_TYPE,
0L,
false,
false,
""
);
return new Column[]{
col1, col2
};
}
public Object[] getInlineOutputFieldValues(SeaTunnelRowAccessor inputRow) {
Object[] fieldValues = new Object[2];
// get age
Object ageField = inputRow.getField(1);
fieldValues[0] = "JAVA";
if (Integer.parseInt(ageField.toString()) == 20) {
fieldValues[1] = 40;
} else {
fieldValues[1] = ageField;
}
return fieldValues;
}
"""
}
}
|
字段映射
FieldMapper
示例
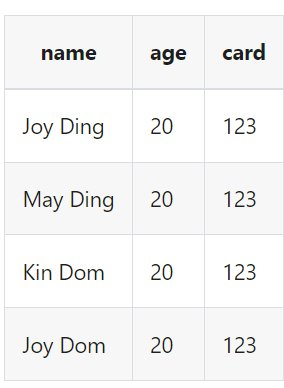
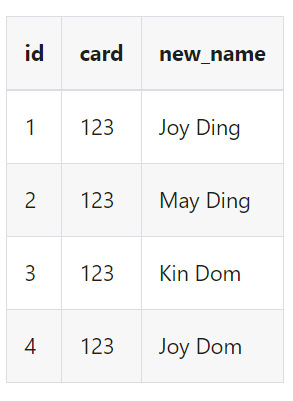
删除age字段,然后更新字段顺序为id,card,name,同时重新命名name为new_name
1
2
3
4
5
6
7
8
9
10
11
| transform {
FieldMapper {
source_table_name = "fake"
result_table_name = "fake1"
field_mapper = {
id = id
card = card
name = new_name
}
}
}
|
过滤
Filter
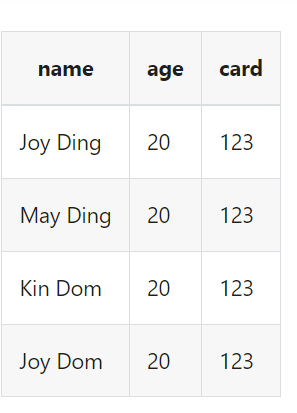
示例
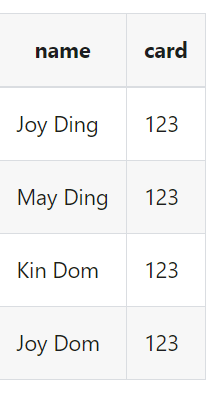
我们想要保留字段name和card
1
2
3
4
5
6
7
| transform {
Filter {
source_table_name = "fake"
result_table_name = "fake1"
include_fields = [name, card]
}
}
|
如果我们想要删除age的话
1
2
3
4
5
6
7
| transform {
Filter {
source_table_name = "fake"
result_table_name = "fake1"
exclude_fields = [age]
}
}
|
json
解析json
src_field
要解析的 JSON 源字段
支持的Seatunnel数据类型
- STRING
- BYTES
- ARRAY
- MAP
- ROW
- dest_field
使用 JSONPath 后的输出字段
dest_type
目标字段的类型
path
Jsonpath
column_error_handle_way [Enum]
该选项用于指定当列发生错误时的处理方式。
FAIL:选择FAIL时,数据格式错误会阻塞并抛出异常。
SKIP:选择SKIP时,数据格式错误会跳过此列数据。
SKIP_ROW:选择SKIP_ROW时,数据格式错误会跳过此行数据。
示例
现在我们的源数据是这样的,我们想要提取属性
1
2
3
4
5
6
7
8
9
10
11
12
13
14
|
{
  "data": {
    "c_string": "this is a string",
    "c_boolean": true,
    "c_integer": 42,
    "c_float": 3.14,
    "c_double": 3.14,
    "c_decimal": 10.55,
    "c_date": "2023-10-29",
    "c_datetime": "16:12:43.459",
    "c_array":["item1", "item2", "item3"]
  }
}
|
1
2
3
4
5
6
7
8
9
10
11
12
13
14
15
16
17
18
19
20
21
22
23
24
25
26
27
28
29
30
31
32
33
34
35
36
37
38
39
40
41
42
43
44
45
46
47
48
49
50
51
52
53
54
55
56
57
58
59
60
61
| transform {
JsonPath {
source_table_name = "fake"
result_table_name = "fake1"
columns = [
{
"src_field" = "data"
"path" = "$.data.c_string"
"dest_field" = "c1_string"
},
{
"src_field" = "data"
"path" = "$.data.c_boolean"
"dest_field" = "c1_boolean"
"dest_type" = "boolean"
},
{
"src_field" = "data"
"path" = "$.data.c_integer"
"dest_field" = "c1_integer"
"dest_type" = "int"
},
{
"src_field" = "data"
"path" = "$.data.c_float"
"dest_field" = "c1_float"
"dest_type" = "float"
},
{
"src_field" = "data"
"path" = "$.data.c_double"
"dest_field" = "c1_double"
"dest_type" = "double"
},
{
"src_field" = "data"
"path" = "$.data.c_decimal"
"dest_field" = "c1_decimal"
"dest_type" = "decimal(4,2)"
},
{
"src_field" = "data"
"path" = "$.data.c_date"
"dest_field" = "c1_date"
"dest_type" = "date"
},
{
"src_field" = "data"
"path" = "$.data.c_datetime"
"dest_field" = "c1_datetime"
"dest_type" = "time"
},
{
"src_field" = "data"
"path" = "$.data.c_array"
"dest_field" = "c1_array"
"dest_type" = "array<string>"
}
]
}
}
|
在这里我们可以配置异常数据的处理逻辑
row_error_handle_way 配置对行数据内所有数据异常进行处理,column_error_handle_way 配置对某列数据异常进行处理,优先级高于 row_error_handle_way。
跳过任意列有异常的整行数据
1
2
3
4
5
6
7
8
9
10
11
12
13
14
15
16
17
18
19
| transform {
JsonPath {
row_error_handle_way = SKIP
columns = [
{
"src_field" = "json_data"
"path" = "$.f1"
"dest_field" = "json_data_f1"
},
{
"src_field" = "json_data"
"path" = "$.f2"
"dest_field" = "json_data_f2"
}
]
}
}
|
跳过部分异常数据列
配置仅对 json_data_f1 列数据异常跳过,填充空值,其他列数据异常继续抛出异常中断处理程序
1
2
3
4
5
6
7
8
9
10
11
12
13
14
15
16
17
18
19
20
21
| transform {
JsonPath {
row_error_handle_way = FAIL
columns = [
{
"src_field" = "json_data"
"path" = "$.f1"
"dest_field" = "json_data_f1"
"column_error_handle_way" = "SKIP"
},
{
"src_field" = "json_data"
"path" = "$.f2"
"dest_field" = "json_data_f2"
}
]
}
}
|
部分列异常跳过整行
配置仅对 json_data_f1 列数据异常跳过整行数据,其他列数据异常继续抛出异常中断处理程序
1
2
3
4
5
6
7
8
9
10
11
12
13
14
15
16
17
18
19
20
21
22
| transform {
JsonPath {
row_error_handle_way = FAIL
columns = [
{
"src_field" = "json_data"
"path" = "$.f1"
"dest_field" = "json_data_f1"
"column_error_handle_way" = "SKIP_ROW"
},
{
"src_field" = "json_data"
"path" = "$.f2"
"dest_field" = "json_data_f2"
}
]
}
}
|
替换
replace_field [string]
需要替换的字段
pattern [string]
将被替换的旧字符串
replacement [string]
用于替换的新字符串
is_regex [boolean]
使用正则表达式进行字符串匹配
replace_first [boolean]
是否替换第一个匹配字符串。仅在 is_regex = true 时使用。
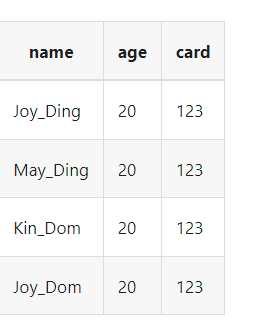
示例
1
2
3
4
5
6
7
8
9
10
| transform {
Replace {
source_table_name = "fake"
result_table_name = "fake1"
replace_field = "name"
pattern = " "
replacement = "_"
is_regex = true
}
}
|
1
2
3
4
5
6
7
8
9
10
11
12
13
14
15
16
17
18
19
20
21
22
23
24
25
26
27
28
29
30
31
32
33
| env {
job.mode = "BATCH"
}
source {
FakeSource {
result_table_name = "fake"
row.num = 100
schema = {
fields {
id = "int"
name = "string"
}
}
}
}
transform {
Replace {
source_table_name = "fake"
result_table_name = "fake1"
replace_field = "name"
pattern = ".+"
replacement = "b"
is_regex = true
}
}
sink {
Console {
source_table_name = "fake1"
}
}
|
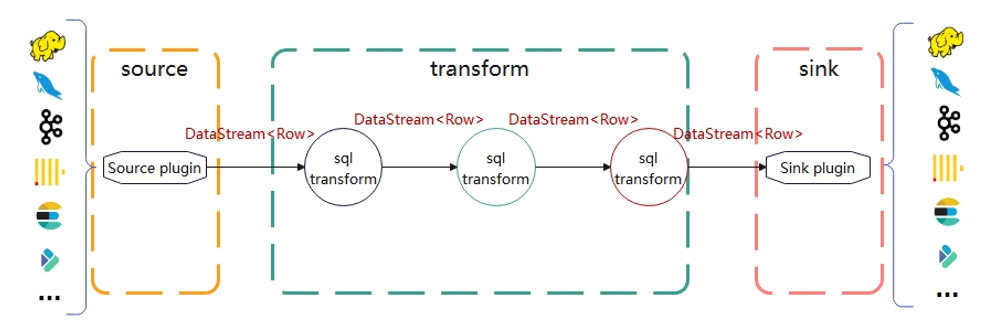
核心数据结构row
row是seatunnel的核心数据结构。一般是source传递给transform一个DataStream,transform转换完后再向下游传递一个DataStream,Sink再把处理完的DataStream输出到外部系统中
Seatunnel的基本原理
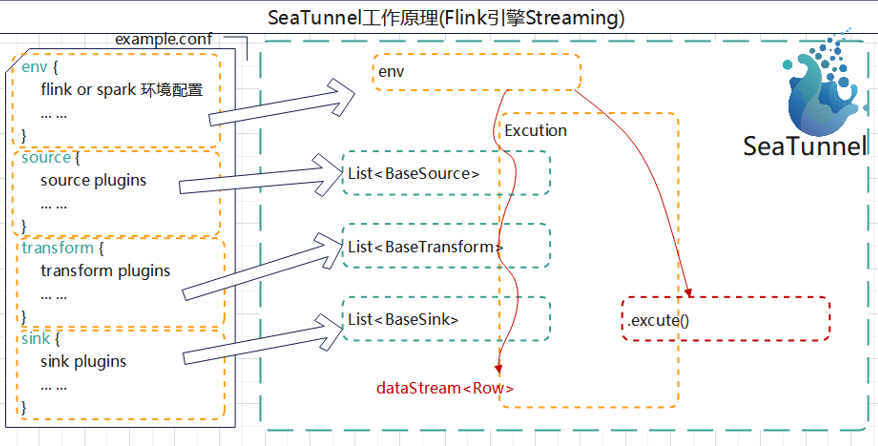
- seatunnel会先解析配置文件中的内容,创建环境
- seatunnel会将source,transform,sink转换为list集合的方式存下来
- 再用excution对象来拼接各个插件,这里面有注册result_tablke,source_table,注册udf函数等等流程,然后执行。主要的执行和拼接插件的工作就是由这个excution来完成的
这里的source_table_name就是收到的上游传递下来的表名,result_table_name就是往下游传递的表名
具体看如下官网示例:
1
2
3
4
5
6
7
8
9
10
11
12
13
14
15
16
17
18
19
20
21
22
23
24
25
26
27
28
29
30
31
32
33
34
35
36
37
| env {
job.mode = "BATCH"
}
source {
FakeSource {
result_table_name = "fake"
row.num = 100
schema = {
fields {
name = "string"
age = "int"
card = "int"
}
}
}
}
transform {
Filter {
source_table_name = "fake"
result_table_name = "fake1"
fields = [name, card]
}
}
sink {
Clickhouse {
host = "clickhouse:8123"
database = "default"
table = "seatunnel_console"
fields = ["name", "card"]
username = "default"
password = ""
source_table_name = "fake1"
}
}
|
这里我们就是首先从source端获取到的数据,往下游传递时候放在了fake表中,下游transform收到了fake表后将fake表转换后传递到了fake1表中,最后sink端收到了fake1表后将数据输出到clickhouse中
seatunnel总结